To setup AX7 or Microsoft Dynamics 365 for Operations.
Prerequisites
- Azure Subscription
- Two virtual machines of D13, don't worry about setting this VM, it will be done automatically during setup.
- Microsoft Office Account
- Browser mode must be InPrivate Browsing mode for Microsoft Edge browser or Incognito window for chrome browser
- If you want to use your normal browser mode, delete its cookies and restart your browser.
With all these set, you can
Start a new project in LCS
To use Lifecycle service to manage your environment you must create a project
- Goto https://lcs.dynamics.com.logon/index
- click sign-in
- Login with your Microsoft office 365 account
- Click + icon to create a new project

5. Select project type

6. Enter project information and click create

Creating a project was easy. Now let's Deploy environment
Before you deploy your environment you must setup VSTS,(Visual Studio Team Services).
VSTS Setup
- Login to https://www.visualstudio.com
- Click "Free Visual Studio" in top right corner
- Under the Visual Studio Team Services, click "Free Account"
- The user who wants to be VSTS owner should sign in with his/her work account.
- Enter a customer/organization specific URL
- Choose Team Foundation Version Control (TFVC) and click continue.
- The VSTS account is created https://<org/customer>.visualstudio.com. This comes with a default project "My FirstProject".
In order to connect VSTS to LCS you will create another project.
- Click on "Team Services" in the top left corner to exit the project
- Click New under "Project and Teams"
- Enter Project Name, Process Template must be Agile, Version control must be TFVC
- Click "Create Project"
Finally for this section you need a Personal Access Token
- Click on your name in the top right corner
- Select security
- Click on Personal Access Token
- Click Add
- Enter a description
- Expiration date: choose the maximum
- Under Authorized Scope: Select All scopes
- Create token.
This generates an alpha-numeric token which should be copied and saved because it is important for the connection to LCS.
Setup LCS integration with VSTS
- Goto LCS: Setup VSTS is either found on the LCS homepage or in Project Settings

- Enter VSTS Url
- Paste Personal Access Token

- Click Continue
- Select the new VSTS Project you created.

- Click Save
- Click Authorize

- Click Yes

- Click Accept
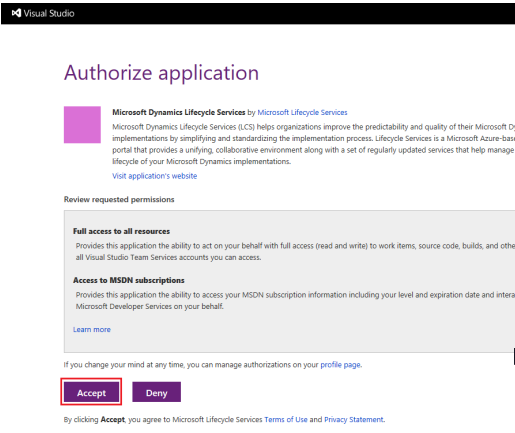
- Setup is Complete

With VSTS Setup let's move on to the next phase. The Final Saga
Integrate LCS with Azure
NB: The steps in this section require the old and new Azure portal.
- Goto Project Settings.
- Click on Azure Connector on the left navigation pane.
- Follow the steps here to Integrate LCS with Azure successfully.
After a successful integration, you should have something like this

Deploy Environment
Environment should be deployed to an existing Azure subscription.
You can create an environment in two ways:
- Deploy to Microsoft cloud (Azure)
- Download the local VHD and operate it on-premise.
My thought on that if you ask, just go with the cloud. it takes more than enough resources to operate AX7 on-premise and also since 365 for operations is a cloud platform why drag yourself backwards.
- Click on cloud hosted environment
- In the Environment Click the +Add icon
- Select your environment

- Select the topology to deploy
- Deploy your environment: Environment must not have space or number

- Click the environment to view details about the deployment status.
- The first deployment will take a few hours, but each subsequent deployment will be much faster.
- When the deployment status changes to Deployed, click Login to connect to the client, or click the VM name to the development machine by using Remote Desktop.
- After the deployment is completed, you can find the base URL, and also the information that you require to connect to the environment via Remote Desktop